- "The footage from the surveillance cameras might run through here."
- — Phi, on the possibility of finding footage in the room
The Security room is an escape room behind the leftmost white Chromatic Door in Warehouse B on Floor B. Sigma and Phi go through this room on Luna's route using Luna's bracelet.
Layout
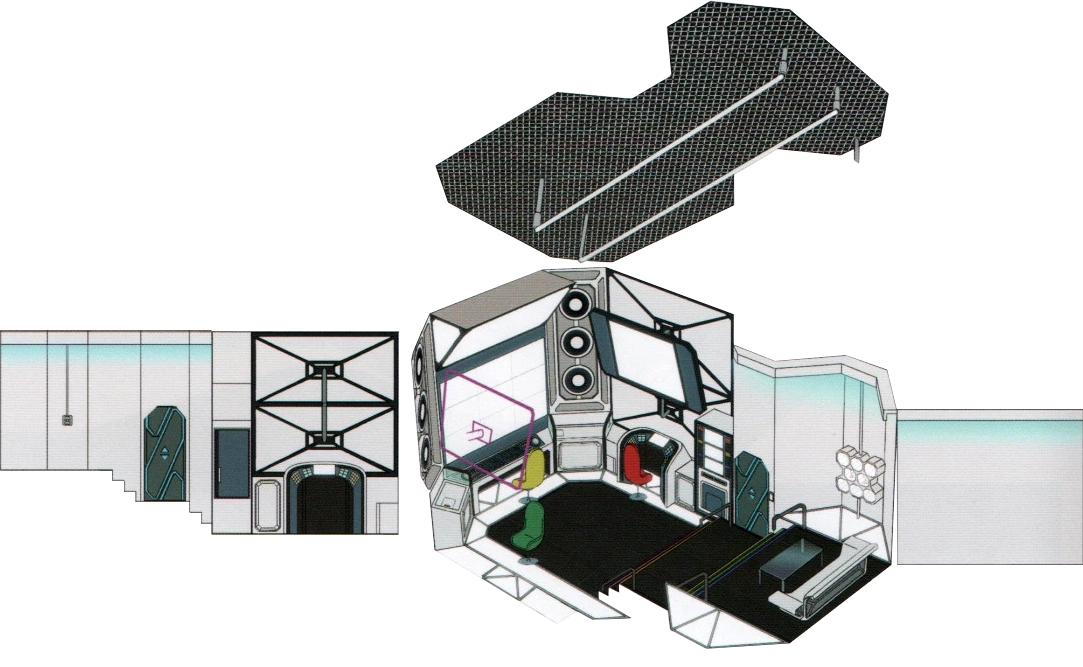
Concept art.
The Security room has three large computer screens in the front of the room. The center computer has three speakers on both the left and right sides of the monitor and shows what is occurring in real time in the facility. Each computer has a different colored chair: green on the left, yellow in the middle, and red on the right. Each computer monitor has a large screen above it. To the left of the green chair is a device that enables or disables the monitors in the front area of the room. There are stairs that divide the room, going up towards the back. Each step has a different colored strip of light on its front. In the back of the room, there is a light switch shaped like a lion's face with a red button in its mouth. The button has a Sun symbol on it. Near the switch stands a small glass table and a gray sofa.
Story
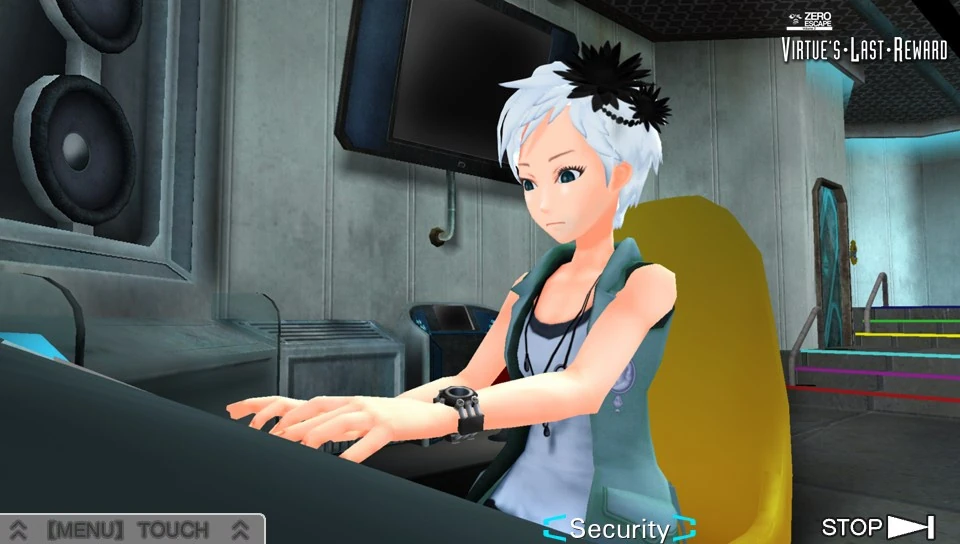
Phi using the computer in the Security office.
Sigma accesses this room with Phi on Luna's route, after K forces Sigma and Phi to go through one of the white doors by punching them. After recovering, they search the security room and find the star keys and the exit key.
After Sigma unlocks the exit, Phi suggests looking at the security cameras, saying it might reveal who the killer is and possibly who Zero is. Although most of the files had been deleted, Phi is still able to access some of the files on the computer from G-OLM's logs, despite him being deactivated some time before by Zero III. It shows Sigma and Phi getting punched by K and placed in one of the white doors, and K in the Crew Quarters 19 minutes before the Chromatic Doors open. However, before they try to find anything else, Sigma starts to show signs of Radical-6 infection. He can't understand what Phi is saying and she appears to be talking as though she was a video on fast forward.
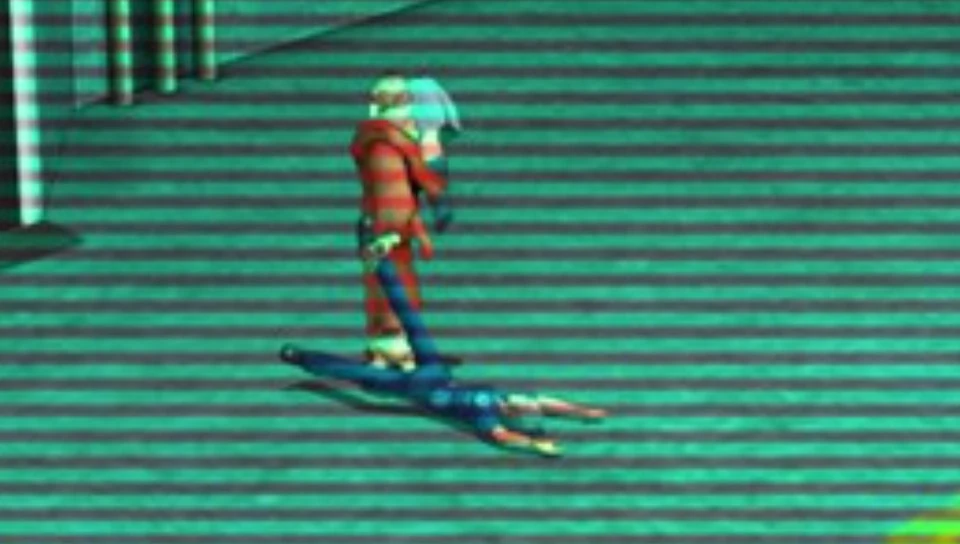
Security image showing K dragging Phi and Sigma into the white door.
He lies down on the nearby sofa for a while. When he feels better, Phi tells him that she used G-OLM's records from before to find more security images in the Crew Quarters when Luna was killed. They watch the security images as Luna and Clover walk into the room and Clover yells at her. However, Sigma and Phi cannot get the audio to this log because it has been transferred into code. They then disappear from the screen, but soon, Clover runs out of the room. Soon after, Dio enters the room and disappears from the camera, which confuses Sigma as to what he said about leaving Floor B, since he said that he stayed on that floor. The security image then shows Dio leave the room in a hurry. Soon, K walks in and disappears off the camera. He then checks his bracelet, which says "19" on it and leaves. This is when he meets with Sigma and Phi in Warehouse A and informs them on Luna's fate.
Sigma uses the security footage Phi showed him to form a guess on who killed Luna. He can choose from either Clover, Dio, or K. Regardless of Sigma's guess, Phi believes it to be Clover because of Alice's death and the movement of the AB Room. She also says that Dio knew Luna was dead when they met up with him on Floor B, because otherwise, he would have objected to going through the white doors. She also says that Clover might have killed her because she might have admitted to killing Alice or she provoked Clover. However, the images don't reveal who killed Alice and who Zero is. Sigma and Phi then decide to head back to Floor A to question Clover, but are not sure if she is still alive, since they don't know if she, Tenmyouji, and Quark went through one of the white doors.
Items
Hourglass With Red Sand
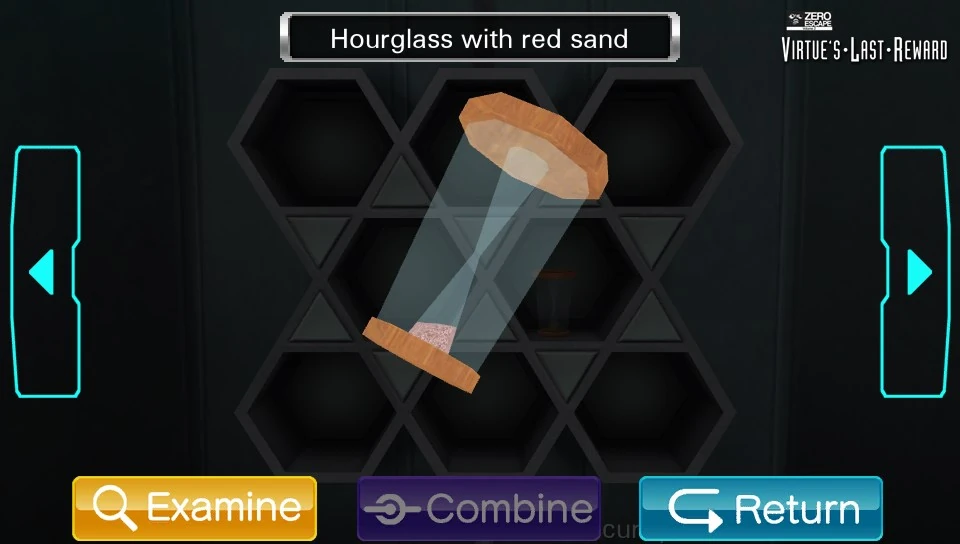
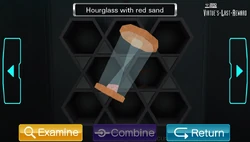
Red sand!
The Hourglass with red sand is found on the left set of shelves on the upper floor of the room. The number and color of the hourglass are used as clues in the puzzle at the main monitoring station. This item is also used in the following novel section.
Hourglass With Yellow Sand
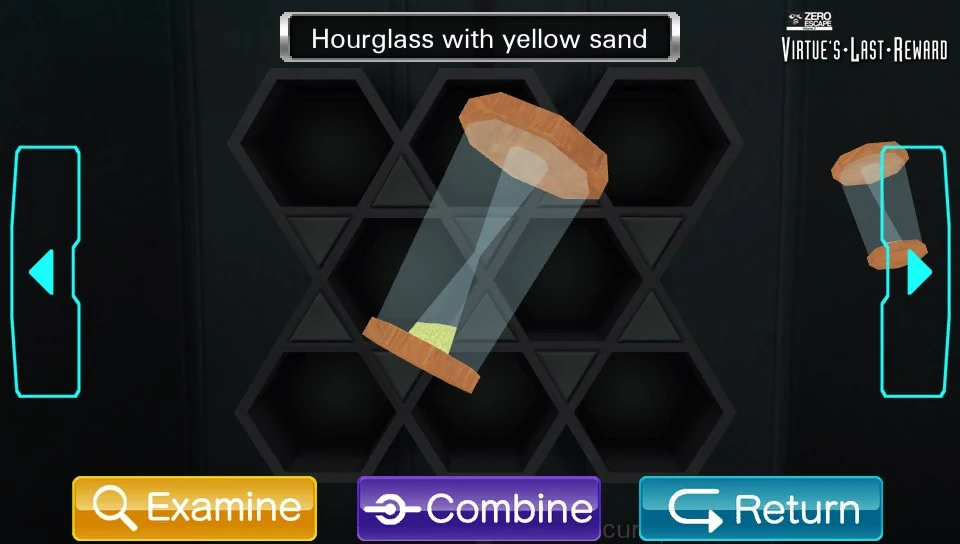

Yellow sand!
The Hourglass with yellow sand is found on the left set of shelves on the upper floor of the room. The number and color of the hourglass are used as clues in the puzzle at the main monitoring station. This item is also used in the following novel section.
Minigames
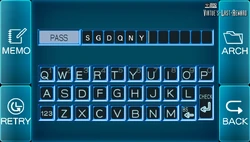
Password Input
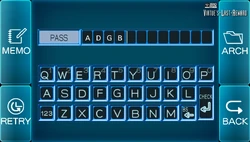
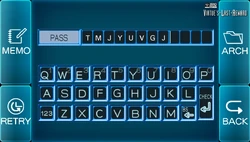
This minigame is played three times in this room: at the left, right, and center consoles. The passwords for each of the consoles can be found on the stairs in the room after the lights have been turned off. The passwords are displayed beneath steps of different colors, so the player needs the green, yellow, and red passwords. The remaining passwords on the steps are useless.
- The password for the left console (with the green chair) is ADGB.
- The password for the right console (with the red chair) is TMJYUVGJ.
- The password for the center console (with the yellow chair) is SGDQNY.
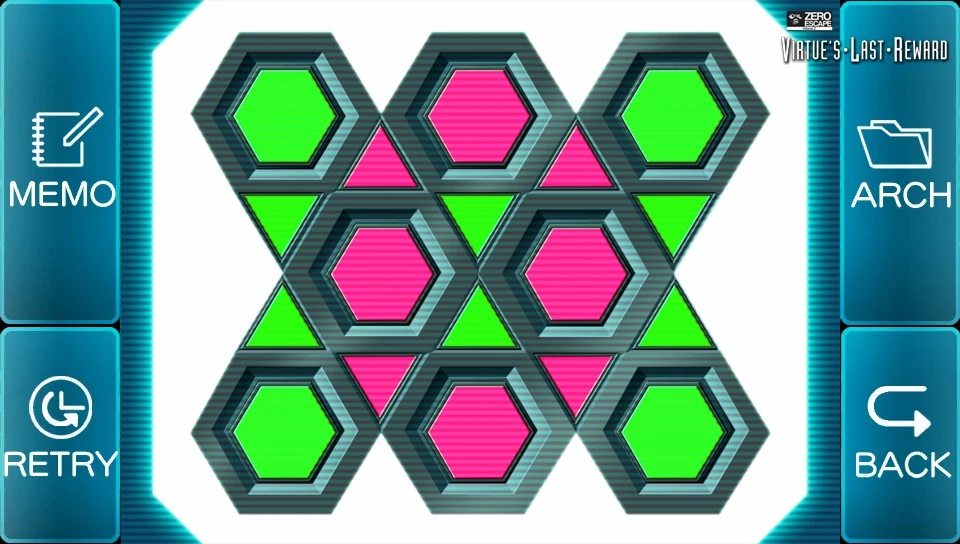
Cabinet Color Shift

Starting point (left).


Starting point (right).
This minigame is played twice in this room, and accessed after entering the passwords into the computers on the sides of the room. In order to complete this minigame, the player must make the design on the computer match the design on the wall when the lights are turned off. The pattern must be solved using four moves.
One the left console, all of the hexagons must be green and all of the triangles must be red. There are multiple ways to accomplish this. One method is to touch the top & bottom red hexagons in any order, then touch the two remaining the red hexagons.
On the right console, all of the hexagons must be red and all of the triangles must be green. There are multiple ways to accomplish this. One method is to touch the two red triangles in the middle in any order, then touch the two green hexagons.
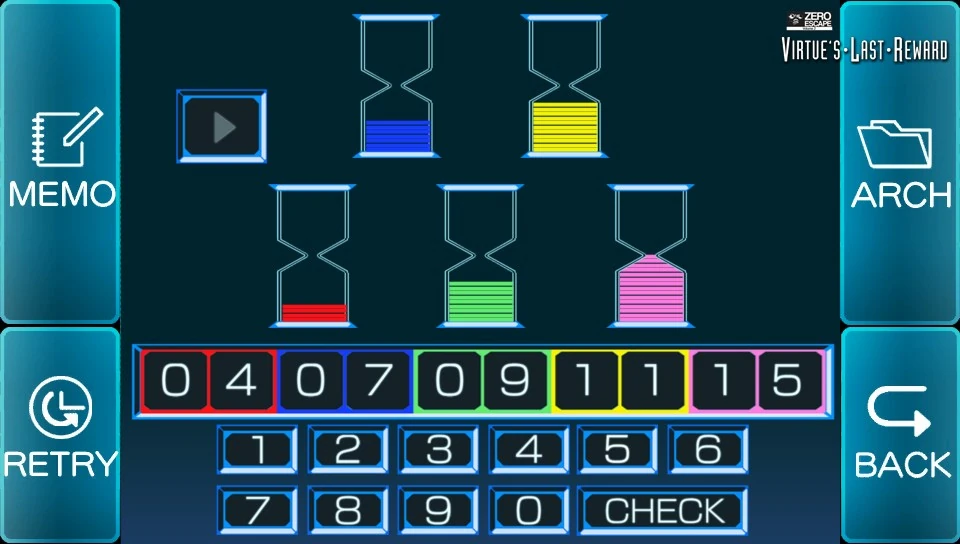
Hourglass Determination

Solution to the minigame.
This minigame is accessed after putting the correct password into the central computer in this room. In this minigame, the player must calculate the value for each hourglass on the screen. If the number is a single digit number, then the player must type in a zero. Another way to do this is to count all of the lines of sand in each hourglass, but this is harder in the 3DS version due to the lower resolution.
Thus, the correct sequence is 04 07 09 11 15.
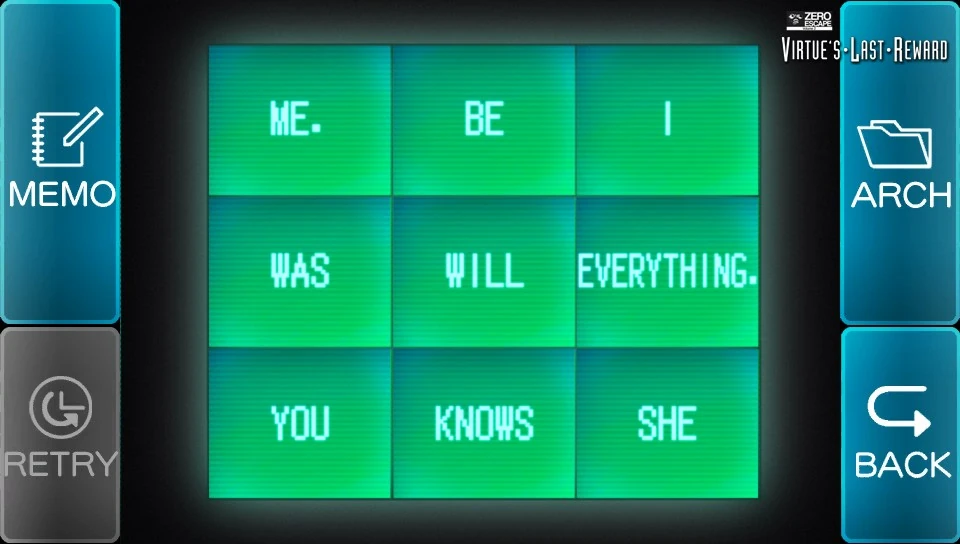
Screen Sentences

Screen sentences game.
This minigame is accessed after completing the "Hourglass Determination" and the "Cabinet Color Shift" minigames. This minigame requires the player to arrange the words on the main monitor in a certain order. However, the player must shut off the words they don't need using the on and off switches for each screen, located on the electrical panel in the room. Depending on which sentence you make, you will receive the Escape or File password.
The escape password is:
| ON | ON | ON |
| ON | ON | OFF |
| ON | OFF | OFF |
| I | WAS | YOU |
| WILL | BE | ME |
| ... | ... | ... |
The file password is:
| OFF | OFF | OFF |
| OFF | OFF | ON |
| OFF | ON | ON |
| ... | ... | ... |
| ... | ... | ... |
| SHE | KNOWS | EVERYTHING |
Trivia
- This is one of only three escape rooms (The other two are the Elevator and the Treatment Center) where only one person is helping Sigma solve the puzzles in the room to escape.
- The security images show the Elevator, Warehouse A, Warehouse B, Lounge, Infirmary, Crew Quarters, GAULEM Bay, Rec Room, and Pantry while completing the puzzle.
- A more difficult version of the Cabinet Color Shift minigame is played in Q.
- This room is only seen on Luna's route.
- This escape room contains one of the "lion eating a red sun" motifs, in the form of a button and a light switch.
- The GAULEM IDs in the Security screen contain secret references to Dr. Who, My Little Pony, etc. There is one for each of the main six ponies.[1]
| SPOILER WARNING | |
| |
Humorous Quotes
- Enter the passwords for all three consoles.
 Sigma: Done. Phi: Good. That's all of them, then. Phi: Oh, well done. Sigma: Would it really kill you to take that disdain down, like, ten percent? Phi: Yes. Sigma: ... Phi: Look at the corner of the screen. Sigma: Yeah... An icon.
- Back out of the puzzle where you receive the safe passwords.
- Sigma: Damnit. No dice. Phi: Get a hold of yourself. Phi: I'm discounting on you. Sigma: Hey! What's that supposed to mean?!