SPOILER WARNING
Every escape room article is spoiler-free to assist first-time players, but do not click any links on the article if you wish to avoid spoilers. Spoilers are also hidden in optional toggles.
- "Are you saying that we're going to have to search through this room for 1 little card?!"
- — Clover, commenting on the messiness of the room
The Study, also known as Zero's Study, is the final escape room in Nine Hours, Nine Persons, Nine Doors (though it is not the final puzzle, as one more puzzle is done in the room that the Study leads to). It is located behind the library on the Bottom Deck and is full of puzzles that have previously been used in other escape rooms.
Layout[]
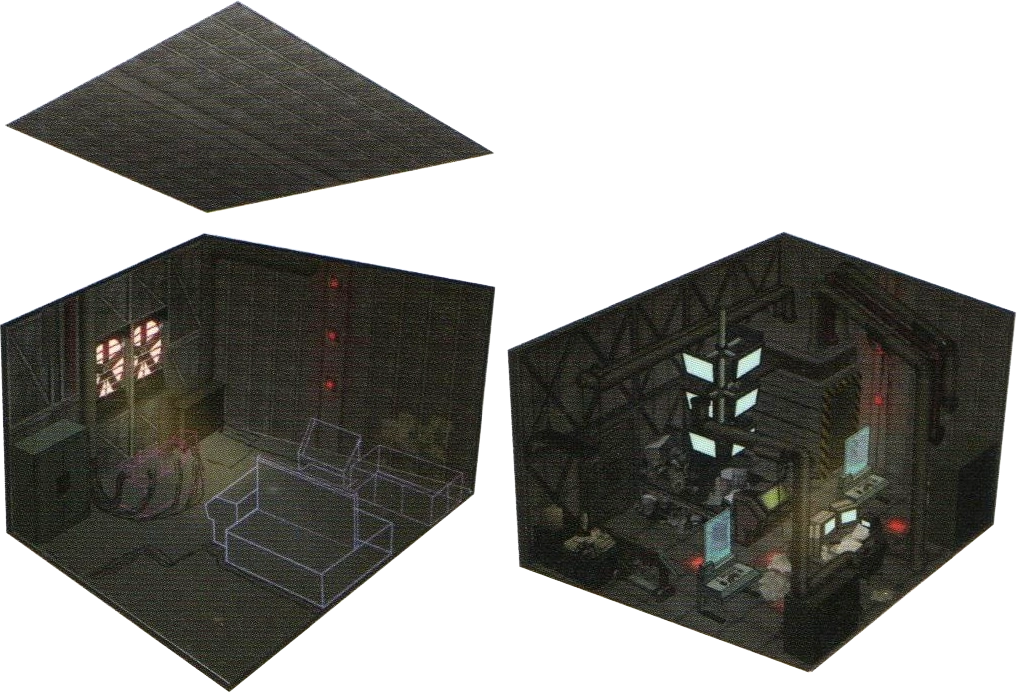
The Study's appearance.
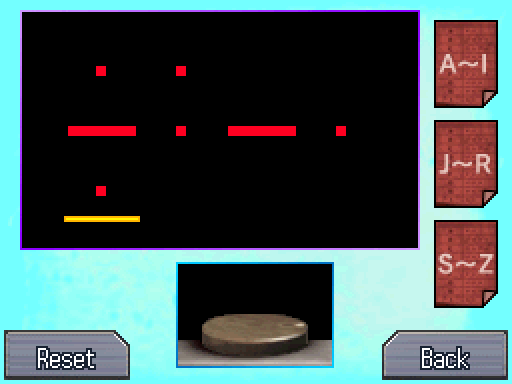
The study was apparently used by Zero as a laboratory. It is a small room, with metal plates as walls. There are numerous piles of electronic junk scattered around the room (the ones used for the puzzles), and 3 huge monitors scattered along the back of the room. A table with smaller computer monitors is also located in the back. Extending from the ceiling is a set of monitors, recording video on every room in the ship. On the far left side is a metal shutter, whose entrance is surrounded with yellow warning tape, and behind the shutter is a coffin. Near the entrance is a model of the Gigantic. Finally, the exit is on the front wall of the room, with a card scanner installed nearby.
Story[]
Junpei, along with Snake, Clover, and Seven had just escaped from the Library and they stumble into an open door. As soon as they go through it, the door slams shut behind them and locks. Everyone except Snake is daunted by the mess in the room and complain about having to find the Neptune key in the piles of junk. With Snake mentioning that they are running out of time, the four begin their search.
What's in the Coffin?[]
Triggered by opening the metal shutters.
| SPOILER WARNING | |
|
After completing the "Wheel" puzzle and the "Morse Code" puzzle, the group finds a coffin behind a shutter in the room. Junpei and Seven are scared by seeing this, thinking that All-ice is inside. However, upon opening it, they find nothing but the Neptune key and the coffin emblem, which relieves them. This leaves Snake and Clover very confused on what might have scared the two men, but Junpei tells them it was nothing. | |
Picture[]
Triggered by picking up the picture in the drawer after completing the Numbered Door Puzzle.
| SPOILER WARNING | |
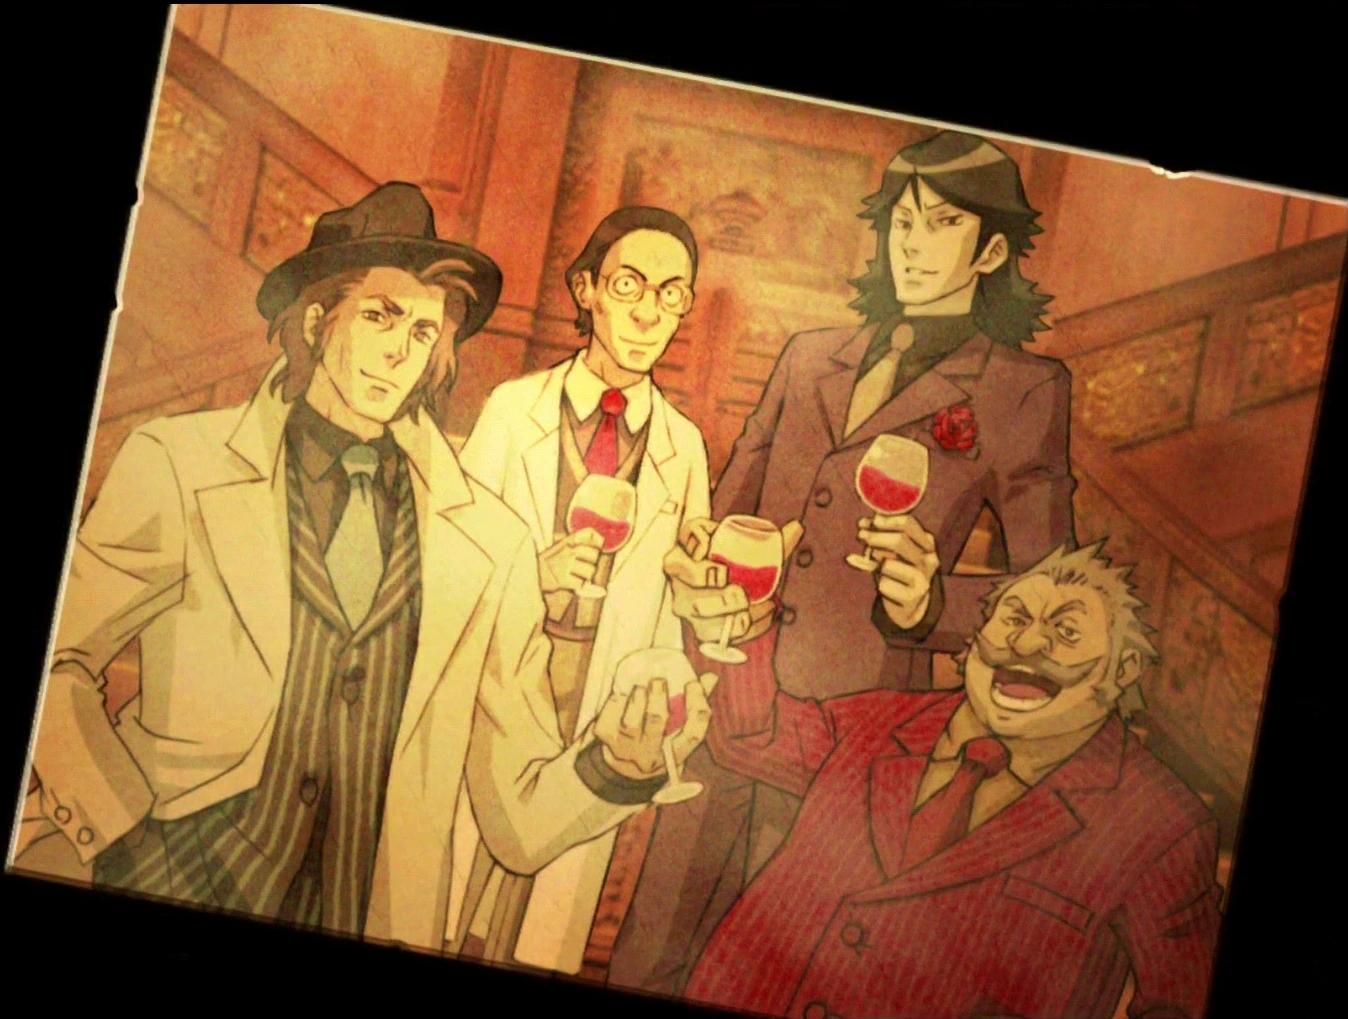 The picture of the four executives found inside the desk. After Junpei inserts the 4 emblems onto the computer scanner, the drawer opens up. A faded picture is inside, showing 4 men celebrating on it. Junpei recognizes 3 of them: Cap, the 9th Man, and Ace. Junpei looks closer at the picture and realizes that they must of been somewhat close, because they were all smiling. Snake asks him to look for the date that the picture was taken, and Junpei looks on the back. It says "Praying for the success of the Nonary Project with Nijisaki, Kubota, and Musashidou." Junpei turns the words over in his head and figures that Hongou must have wrote the message and wonders to himself why he isn't surprised at this revelation and that Ace being Gentarou Hongou was obvious. Snake cuts into his thoughts by saying that Ace and Hongou are the same person. He had been suspicious of Ace's identity from the beginning, recognizing "the voice of the devil". Clover is shocked to hear this new information and asks her brother why he hadn't filled her in. He explains that he couldn't risk her telling anybody else about it. When Junpei is done talking to Snake, Seven asks to see the picture. He starts mumbling the names of the executives to himself (Hongou, Kubota, Nijisaki, Musashidou). Seven paces around the room, still mumbling the names, and tells Junpei to be quiet, as he is close to getting his memories back. Seven opens his eyes and excitedly says that he remembers everything that happened before he was kidnapped to play in the Second Nonary Game. He confirms that Ace is Hongou, Musashidou provided the cash, Nijisaki was the right-hand man, and Kubota did the technical details. Seven says that it will take 3 days to tell the others everything, but Junpei asks for the short version. Nine years prior to the Second Nonary Game (2018), Seven was a lone wolf detective who placed his own values before the rules. This philosophy eventually got him kicked out of the police department. Despite this, Seven decided to follow a lead provided to him by a Cradle Pharmaceutical employee. That night, a ship at the wharf was to take the kidnapped children to a large passenger liner out at sea. Seven quickly went to harbor and saw men loading body bags onto the ship. Suddenly, he felt a gun touch the back of his head, and he set his gun down. As soon as he did, a needle was injected into his neck, knocking him out. Seven wakes up with his head hurting in the confinement room. He starts looking around for a way out, and after not finding one, he sits down silently. He was about to sleep when he heard children's voices coming from far away. He looks around for the source of the voice and finds that it's coming from a vent underneath the bed. He rips off the metal grate and starts crawling inside of the vent. He follows the sound of an announcer saying that "Automatic incineration has been activated." Eventually, he finds his way to the Incinerator, where four kids were pleading for help.  Seven pulls the helpless children up. Seven asks them where the exit is, and they say that there isn't one. Seven realizes that he was 30 feet above the ground and had no way to pull the children up. He has an idea and quickly crawls back to his room. He makes a rope out of bedsheets and drops the rope near the children, telling them that he will pull them up. When he was pulling the last boy up, there is knocking on the incinerator's door, with an enraged man looking through the small window. Seven recognizes him as Gentarou Hongou. Hongou leaps at the rope, trying to grab it, but Seven pulls it up just in time. The group crawls into the duct, eventually finding a way out. They find themselves in a narrow hallway, in front of a set of double doors and the Incinerator door. With Hongou behind the incinerator door, they decide to go through the double doors. Behind it is a giant spiral staircase. Seven instructs the children to run, and they all dash up the stairs. The boy in the uniform stops and says that his sister Akane had not followed them. The boy decides to go back and retrieve her. Seven runs after him and tells the other two children to keep going. The girl agrees, but the boy insists on coming with him. They run all the way back to the bottom floor, where they hear her screaming for help. Hongou is forcibly pulling her into the incinerator. They run to try to stop him, but he gets into the incinerator and locks the door. Akane pleads for help from the inside as Hongou reactivates the incineration process. The countdown ends, and with no way to get her out, the incineration process starts and burns her alive. Once the door opens, the boy with the uniform runs in, shaking. He sees her charred remains and collapses, crying and screaming. Junpei asks Seven for Akane's last name and he solemnly replies "Kurashiki".   Santa was the boy in the uniform? Junpei freezes with shock and has no more words left. Seven starts talking to Snake and mentions that Snake was the "tall kid with the jacket", which he confirms is correct. Seven asks if he is working for Zero, and Snake denies it. He asks Clover the same question, and she also denies it, saying that she was in Building Q and had nothing to do with the events that occured on the ship in 2018. Furthermore, she is surprised that he had been the detective that rescued everyone on the Gigantic. Seven goes on to say that Santa's real name is Aoi Kurashiki and that he is Akane's brother. Clover and Junpei are in utter shock of this information. Junpei goes on to say that there is still a lot that they don't know about. He says that the body in the shower room dressed up like Snake was Nijisaki, since he's the only executive they haven't seen yet. Junpei says that the murders of the executives support the possibility that Santa is Zero. Clover concludes that Santa is getting revenge for the death of his sister, but he hadn't actually killed anyone. Snake says that Santa's last target is Ace. The room shakes and they hear a rush of water. The time was 6 A.M. They realize that they need to get moving and Junpei takes the 0 key card from the drawer. He quickly swipes the card at the door and the group runs through the exit, hoping to confront Santa about the events that occurred on the ship that day and in the past. | |
Items[]
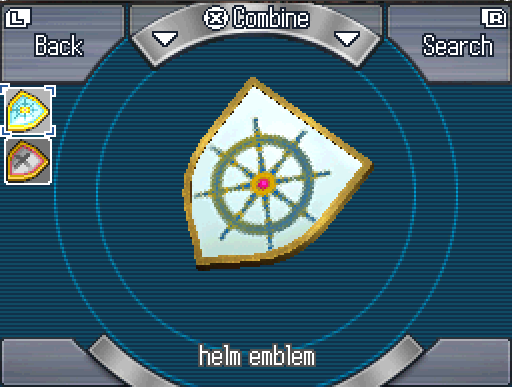
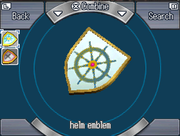
Helm Emblem  []
[]
The helm emblem.
Junpei solves the nautical table puzzle by turning the wheel in the direction that shown on the nautical map. The right side of monitor will slide, revealing the emblem for Junpei to pick up. This emblem has a gold border like the other emblems, and the picture of the helm on the emblem is colored turquoise and yellow.
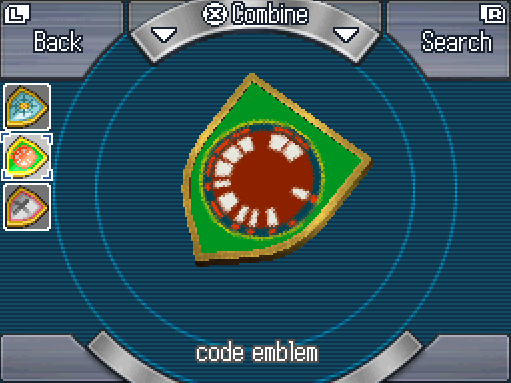
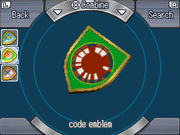
Code Emblem []
The code emblem.
This emblem is found on the back of the morse code device after Junpei transmits a message that says "ICE" with the machine. The emblem has a green background and a red circle with white colored sections within the circle. He thinks there might be some sort of secret code on it. Translating the morse code on the edge of circle starting at the two dashes and rotating counter clockwise reads "MORSE".
Cross Emblem []
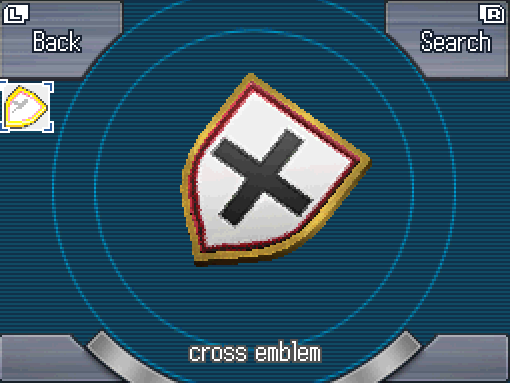

The cross emblem.
This emblem is found on the right side of the control panel of the monitor with the "ALL" puzzle after Junpei solves it. The emblem has a white background with a black cross on it. The secondary border color is red and Junpei comments that it is shaped like a shield.
Coffin Emblem []
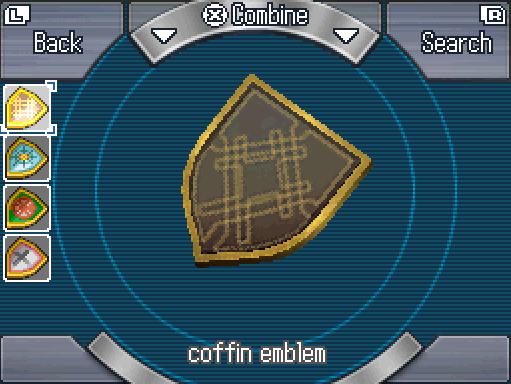

The coffin emblem.
After solving the first 3 puzzles and getting the emblems from them, a metal shutter from the back of the room opens. Behind it is a fancy brown coffin with gold engravings. Junpei and Seven are fearful that it might be All-ice's coffin and slowly open it to find the Neptune key and this emblem. The emblem design is the same as the design on the coffin.
Key Card 0 []
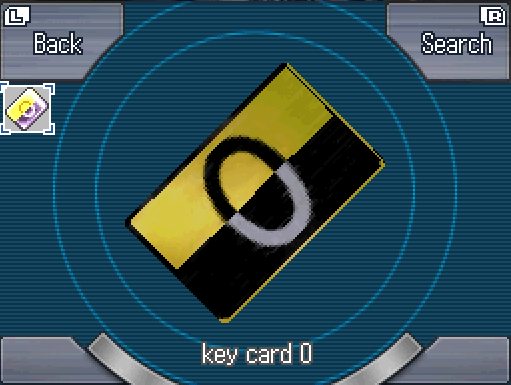

The 0 key card.
Junpei finds the computer in the back of the room and inserts the emblems in this order: Helm, Cross, Code, Coffin. In between placing each emblem down, he has to solve a digital root puzzle. In the puzzle, he has to move every colored ball (except red) into an area where the digital root of the balls match the digital root shown in the area. After doing this for all 4 emblems, the drawer on the desk unlocks, containing a picture and this keycard.
Neptune Key[]
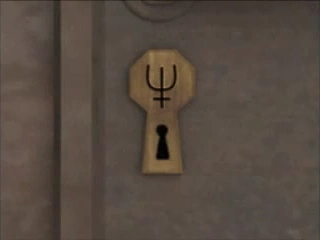
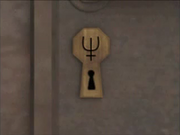
The Neptune keyhole.
By solving the first three puzzles and getting their respective emblems, a metal shutter located in the back of the room opens. Behind the shutters is a fancy coffin with gold engravings. The group nervously opens it, only to find that their fear was all for nothing. The coffin contains the coffin emblem and this key.
Nautical Chart[]
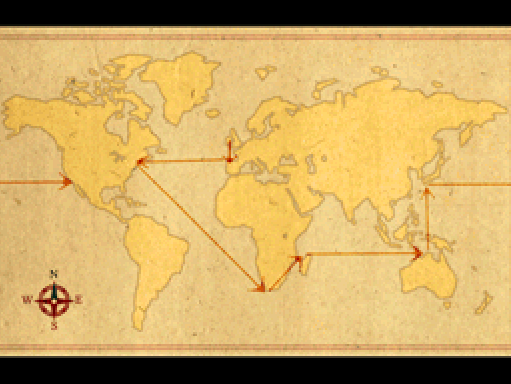

The nautical map.
A nautical map found on a table near the entrance of the room. It is a map of the world with a path drawn out in red ink. The route appears to be going from England to California.
9 Panel Cross Puzzle-Draft 1[]

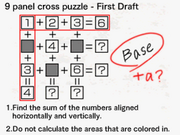
An obscure hint on how to solve the most difficult puzzle in the game.
A clue for the panel puzzle. It is found in the cabinet behind the monitor with the puzzle. It appears that someone was working on the solution to the puzzle and boxed the far left and top sections of the grid.
Morse Alphabet Key[]
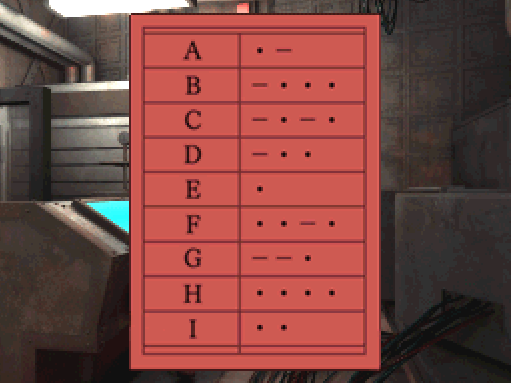

The morse code key for A-I.
A red sheet with the key to input letters in Morse code. It is found with in a cabinet behind the morse code puzzle and has the letters A-I, J-R, and S-Z on 3 different sheets. Junpei uses it to input letters in the machine. It is stored on the file screen.
Minigames[]
Nautical Chart Puzzle[]


The navigation system.
A puzzle similar to the helm puzzle found in the wheelhouse. This version is easier however, as the map is viewable in the top screen. To solve it, just start from England and turn the wheel until it stops on the direction shown on the map. The order of directions is: South, West, Southeast, Northeast, East, North, East.
Morse Code Puzzle[]

The solution to the puzzle (ICE).
A puzzle similar to the morse code puzzle solved in the communications office. The morse code machine is built right into the computer this time, in contrast to the actual machine used back in the communications room. To solve it, form the word "ICE", with each row representing one letter.
ALL Square[]
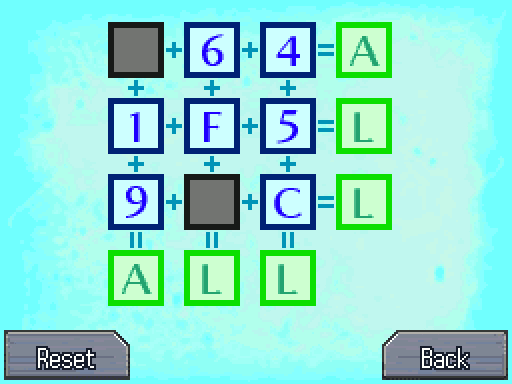
The ALL panel solved.
Perhaps the most difficult puzzle in the entire game (to compute, not to enter the answer), it is found on a giant monitor near the corner of the room.
This is the grid with all the letters and numbers:
| D | 6 | 4 |
| 1 | F | 5 |
| 9 | B | C |
The answer is:
| 6 | 4 | |
| 1 | F | 5 |
| 9 | C |
To get them that way, tap the 5, tap the center square, then tap the D. You will get the cross emblem.
Numbered Door Puzzle[]

The solution for the Coffin Emblem.
Requirements: Helm Emblem, Cross Emblem, Code Emblem, Coffin Emblem
This puzzle is located at the back of the room, at the collection of computer monitors on the desk. By placing the emblems in order from Helm, Cross, Code, and Coffin, the computer will unlock the drawer on the table. After each individual emblem is scanned, Junpei has to solve this puzzle.
Helm Emblem: 6=4,5,6 and 3=1,2,3,7,8
Cross Emblem: 1=2,3,6,8 and 7=4,5,7
Code Emblem: 7=4,5,7 and 7=2,6,8
Coffin Emblem: 8=2,4,5,7,8 and 9=None
Trivia[]
- The solutions for the "ALL Square" and "Morse Code" minigames are ALL and ICE, the name of the woman in the coffin that Gordain brought.
- The iOS version omits the scene where Junpei opens All-ice's coffin.
| SPOILER WARNING - DON'T READ UNTIL YOU COMPLETE ENTIRE GAME | |
| |
Humorous Quotes[]
- Examine the back of the metal machine, when seen from the initial screen:
- Clover: Look, Junpei! The rust on here looks like Elvis's face! Junpei: A-Ah... Yeah... How exciting...
- The back of that huge machine. Clover says she can see Elvis's face in it.
- The back of that huge machine. Clover says she can see Elvis's face in it...
- The back of that huge machine. Junpei: ...Okay, seriously, where the hell is it? I can't see it! Clover: Really? See, there's the nose right there, and that's the hair... Junpei: Y-Yeah...sure...
There's nothing there... - The back of the huge machine. I can't see the front from here.
- Examine the chair, when seen from the initial screen:
- Clover: It's a chair.
- Clover: It's a chair.
- Clover: That chair looks nice... Mind if I take a load off? Junpei: I think you'd be doing the opposite. Clover: ...
- A chair.
- Examine a pipe when facing the metal cabinet and vents:
- Seven: A pipe... Clover: A pipe... Snake: A pipe...
- There are 3 pipes here.
- Seven: Gimme a "P"! Clover: Gimme an "I"! Snake: Give me a "P" and an "E"! Junpei: What's that spell?! Pipe! Junpei: What the hell are we doing...
- There are 3 pipes here.
- Examine the table filled with junk, while facing the exit door and the screens on the ceiling:
- There are piles of crap everywhere. Clover: This is a pretty impressive mess... Seven: If we try and search every one'a these, we're gonna be at it 'til the cows come home. Snake: Well, that doesn't seem too bad. We won't have to go bring them in ourselves, then. Seven: Don't you get smart with me, kid! Junpei: Uh, how 'bout we deal with this area later, okay guys? Maybe we should try something more...promising...
- A pile of junk. We don't have the time to go through this.
- There are piles of crap everywhere.
- Examine the right small monitor, when viewing the closeup of the old computer monitors:
- Clover: It's so small... I wonder what it is. Junpei: I got no idea.
- Some kind of little machine.
If I turn it upside down, it looks like a robot with its eyes popped out. - Junpei: A small machine... Junpei: I messed around with it a bit, but I couldn't get it to do anything. Seven: Messed around? Didn't know you were into that kinda thing... Clover: Maybe you'd have better luck if you got to know it first, Junpei.... Junpei: You guys are jerks, and it's still not working.
- Some kind of small machine. I have no idea what this thing does...
- Examine the mouse, when viewing the closeup of the old computer monitors:
- A mouse. Nothing happens when I mess with it, though.
- Seven: Looks like the mouse. Clover: Squeak squeak... Junpei: I knew that was coming... Snake: This seems to be the sort of room where someone conducted experiments and research... Do you think perhaps this is a laboratory mouse? Junpei: I think that's the worst joke I've ever heard!
- A mouse. Nothing happens when I mess with it, though.
- Junpei: Squeak squeak... Squeak-squeak-squeak? I don't think it can hear me... Clover: Junpei! Stop messing around! Junpei: ...
- A mouse. Nothing happens when I mess with it, though.
- Examine the desk indentations with the steering wheel emblem equipped:
- Let's just drop the emblem of the steering wheel in here...
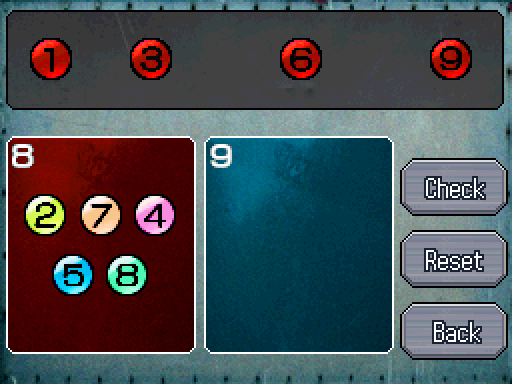
Whoa! Well, now we've got something on the monitors, at least. Seven: W-What's that?! Junpei: Looks like...some kinda puzzle... Clover: I wonder if these are the rules... Clover: Here, I'll read them to you! Clover: - When you touch a numbered area, that area will be selected, and it will turn blue to indicate this. Clover: - Touching a numbered ball after selecting an area will cause that ball to be moved to that area. Clover: - However, you cannot move the red balls. Clover: - You can only move 3 to 5 balls into a single area. Clover: - Press the "Check" button once you have moved all of the balls (except for the red ones, which you cannot move). Clover: - The digital root of the balls in an area must match the number for that area. Clover: ...That's it. Junpei: Uh... I still don't really get it. Junpei: Whatever! Like they say, practice makes prefects! Let's give it a shot! Snake: Don't you mean "practice makes perfect"? Junpei: Hey! Let's see you solve the next one! Then you can make fun of me!
- Let's just drop the emblem of the steering wheel in here...
- Examine the desk indentations with the cross embem equipped, having already placed the steering wheel emblem:
- Okay, let's put in the emblem of the cross... Seven: Hey, Junpei, somethin' just showed up on the screen... Clover: This puzzle sure looks a lot like the last one... Seven: Yeah, but there's more'a those red balls you can't move. Clover: The numbers for each area are different too. Seven: It looks like it's got the same rules as the last one, though. Seven: You sure you don't wanna double-check that? Junpei: No, I'll be fine. If I get confused, I can just look at the screen over there, right? Junpei: Anyway, like they say, a picture is worth 1000 wards! Let's give it a shot! Snake: Isn't that..."A picture is worth 1000 words"? Junpei: Hey, shut it! At least I'm trying, all right!?
- Okay, let's put in the emblem of the cross...
- Examine the desk indentations with the code emblem equipped, having already placed the steering wheel and cross emblems:
- Okay, let's put in the emblem of the secret code... Seven: Damn, this puzzle looks a lot like the last one. Seven: Looks like the rules are the same, though. Clover: Don't you think you should double-check it? Junpei: C'mon, this is the 3rd time I've done this. It'll be fine. Junpei: So this...uh...um... Snake: If you can't think of anything clever, please don't strain yourself. You might hurt something. Junpei: Arg! Shut up! Just gimme a break, all right?! I'll think of something!
- Okay, let's put in the emblem of the secret code...
- Examine the hanging monitor, when vieweing the closeup of the compass monitor machine:
- There are some monitors hanging down from the ceiling here.
- Junpei: Hey, Clover, why don't you hang off those monitors? Clover: No way! Why should I have to do something like that?! Clover: Ooooh, I get it! You're gonna try and sneak a peek inside my underwear, aren't you?! Junpei: That's...impossible. How could I see inside them? Clover: Wha--?! You! You...you pervert! You're a dirty old man! Junpei: Whoa, hey! Lay off, all right! I'm not an old man! Clover: You should be saying you're not dirty!
- There are some monitors hanging down from the ceiling here.
- Examine the wheel or compass before finding the map:
- Clover: Junpei, there's a wheel over here... Junpei: Ah, that should work like the steering wheel. Clover: Sterling? Junpei: No, I'm too poor for that. Clover: Stealing? Junpei: That might solve my money problems, but I'd rather not. Clover: ... Junpei: Oh, right...
[The remainder of the quote has been omitted.]
- Solve the "ALL" puzzle:
- Clover: You did it, Junpei! You're so smart! Snake: You seem to have done an excellent job and solved the puzzle. Snake: Just what I would have expected of you, Junpei. Junpei: H-Hey, c'mon, you're embarrassing me... Seven: Whoa, whoa! Don't get cocky, kid. We don't got time for that. Seven: Look at this. Check out the right edge of the control panel. Seven: The lid slid open, and somethin' came out.
- Solve the compass puzzle:
- Clover: Yay! You did it, Junpei! Clover: Good boy! Who's a good boy! Junpei: Agh! Knock it off! Seven: Hey, we don't have time for screwin' around right now. Seven: Check out the right side of the monitor... Seven: It just kinda slid open, and somethin' came out. Junpei: Oh...yeah... Clover: I heard a noise too... Clover: You know that big box in the hall by the exit? Clover: I think it made a noise... Clover: Like something unlocking, you know? Junpei: A noise, huh...