SPOILER WARNING
Every escape room article is spoiler-free to assist first-time players, but do not click any links on the article if you wish to avoid spoilers. Spoilers are also hidden in optional toggles.
- "You... don't think that thing is going to suddenly... sit up or something, do you?"
- — Lotus, upon seeing the mannequin
The Laboratory is located on C Deck and is the escape room accessed through Door 8. It is a room filled with old-fashioned scientific equipment. Most notably, there is a mannequin with electrodes on its head, possibly suggestive of the type of experiments once performed there. Junpei investigates this room with Lotus and Clover.
Layout[]
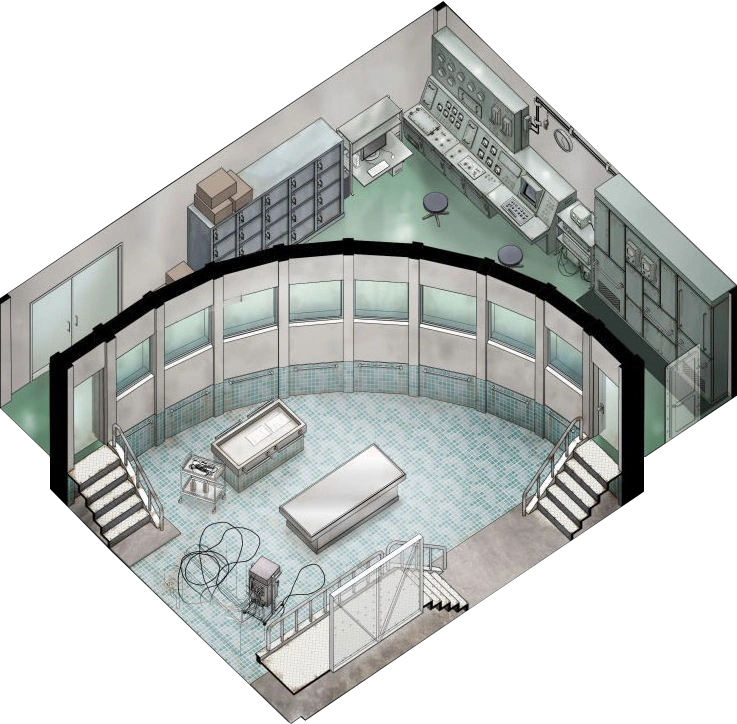
Concept art for the laboratory.
The room is medium sized, rectangular and is divided in two sections by a curved wall shaped like a quarter of an ellipse.
The inner section was most likely where the experiments were once performed, as evidenced by the examination table with a lying mannequin, a second table with what seem to be research notes, and a machine on one of the walls that the game calls an "experimental device".
The outer section appears designed to monitor the experiments, as evidenced by the control panels and the huge glass window occupying most of the curved wall. This room additionally contains a series of lockers and an anachronistically modern wireless display. Access between the two sections is provided by means of two doorways either side of the window in the curved wall, the left one (seen from the outer side) featuring a solid metal door and the right one featuring a vertical iron gate.
Story[]

Clover gets trapped inside the experimental section.
Junpei, Lotus and Clover enter the room by its outer section after Lotus makes a comment about Clover's attitude. Junpei, after taking some moments to observe through the window the conspicuous mannequin (alongside Lotus), notices that Clover, distraught by Snake's disappearance, seems rather uninterested in the situation. His attempts to comfort and getting her to cooperate serve, however, only to aggravate her, when she yells at him, saying that she is worried that something had happened to Snake. She states that she doesn't want to talk and needs time alone, and suddenly runs to the inner section of the room, in order to be left alone. Just as she enters the doorway, the iron gate closes, trapping her.
After trying unsuccessfully to open the gate, the party determines this must be yet another one of Zero's puzzles and sets out to solve it. Junpei and Lotus take care of the outer section while Clover, jostled into cooperativeness by her predicament, investigates the inner section. Her investigation is also controlled by Junpei: by standing next to the window he lets her know what to look at, while any items that are needed from the opposite side can be exchanged at the iron gate.
Computer[]

Junpei wasn't expecting this...
Connecting the 2-pronged power cable to the monitor in the outer section starts a conversation between Junpei and Lotus.
Junpei expresses his surprise at seeing scrolling text appear on the display, since this is not connected to a computer. Lotus, unfazed, simply points out it must be a wireless display, and even asks Junpei whether he has 'been living in a cave'. Shortly thereafter the text stops scrolling leaving only a password request.
Lotus then takes the seat and, after a little show of kneading her hands, twisting her back left and right and throwing in an "All right, let's kick some ass" for good measure, proceeds to start typing at great speed, while Junpei stares in surprise.
The remainder of the conversation depends on the story path:
If Door 5 was taken[]
Junpei will then ask Lotus what her job is. She tells him she is currently unemployed, although she used to work in a cyber security company, which she quit. However, she clams up and avoids the question when Junpei asks her why, so to change the issue he asks her what she it is she is actually doing. She answers she is writing a program that will perform a brute force attack (that is, breaking a cipher by testing all combinations).
The conversation then takes an unexpected philosophical turn. Inspired by the previous discussion about the wireless display, Lotus will raise the hypothesis of the human mind working in a similar way: that the brain is a mere 'display' of a real thoughts that are 'processed' elsewhere (though she doesn't use the term, this is meant to foreshadow the concept of the morphogenetic field.
She points out that then maybe conditions like amnesia, aphasia, blindsight and prosopagnosia might just result from a faulty connection between the brain and the real consciousness. At this point, Junpei interrupts her to ask just what prosopagnosia is, getting the answer that it is a condition that causes one not to be able to identify human faces.
Throughout this conversation Lotus never stops writing her program, and at last she breaks the password, only to be rewarded by the appearance of a puzzle. She decides to take a break and leaves the puzzle for Junpei.
If Door 4 was taken[]


Junpei's life flashes before his eyes...
Junpei will then compliment Lotus by telling her he's feeling pretty amazed. Lotus will then ask him whether he just fell for her again, causing Junpei to, in his haste to deny any interest, state he would not "fall for an old lady" like her. Though Junpei somehow manages to survive the foolish statement, this brings the conversation to an end, so he leaves Lotus to finish whatever she is doing and wanders around the room, looking for possible clues for the password and asking Clover to help. The search turns out to be unsuccessful, and just as Junpei is starting to worry they might be stuck, Lotus's excited cry tells him she as just cracked the password. This results in a puzzle appearing on the display, and Lotus takes a break, leaving it for Junpei.
Locker[]
Upon Junpei picking up the activation key, Clover will call him and ask if she can talk to him for a minute.
If Door 5 was taken[]
Since Junpei went through Door 5 with her brother, Clover asks him if Snake said anything weird during that time. Junpei answers he can't really remember anything of the sort except for his exceptional hearing. He then tentatively takes the opportunity to ask her whether Snake was blind from birth. She answers no, explaining that he got in a bad car accident as a kid, and reveals that in addition to his eyesight, Snake also lost his left arm, in place of which he has a prosthetic one. Junpei then apologizes to her for making her relive bad memories.
If Door 4 was taken[]
Clover starts to ask Junpei something, but quickly decides otherwise, and moves away, leaving him wondering what could she have wanted.
Items[]
Found Items[]
3-Pronged Power Cable  []
[]


The 3-pronged power cable.
This cable is found on a shelf in the outer section on top of some electronic equipment. It is necessary to activate the wireless display, but unfortunately it has the wrong kind of plug.
Combines with 2-pronged plug to form: 2-pronged power cable
Ethanol []


A bottle of ethanol.
A bottle of anhydrous ethanol found in one of the unlocked lockers, and which Lotus identifies as a powerful cleaner. It must be given to Clover so that she can erase the permanent marker marks on one of the tables in the inner section. This allows her to inspect the drawing below which she copies onto Clover's note.
2-Pronged Plug []


The 2-pronged plug.
This plug allows 3-pronged plugs to be used with 2-pronged sockets, and is hence essential to activate the wireless display. It is found by Clover in the inner section near the big machine with all the dials (the 'experimental device').
Combines with 3-pronged power cable to form: 2-pronged power cable
Activation Key []


The activation key.
This key is found in one of the lockers unlocked by solving the Wireless display puzzle, along with the [Earth Key]. It is to be used on the control console located in the outer section, and doing so will activate the 'experimental device' in the inner section, allowing Clover to interact with it.
Clover's Note[]


A note written by Clover.
A note written by Clover and given to Junpei through the iron gate. It reproduces the drawing Clover found in one of the tables after erasing some permanent marker ink with the Ethanol. It contains the solution to the Wireless display puzzle.
This item is not placed in Junpei's inventory. It is instead added to the File screen as the Clover's note entry.
Earth Key[]


A key engraved with the Earth symbol.
This key is found in one of the lockers unlocked by solving the Wireless display puzzle, along with the [Activation key].
It opens the door with the Earth symbol, which is located near the staircase on A Deck, and leads to Door [1].
As with most other Planet keys, it is not placed in Junpei's inventory, being instead only used in the relevant story segments.
Combined Items[]
2-Pronged Power Cable []


The 2-pronged power cable.
Created from: 3-pronged power cable + 2-pronged plug
The natural result of plugging the 2-pronged plug on the 3-pronged power cable. It allows one to finally activate the wireless display.
Minigames[]
Wireless Display puzzle[]


The initial configuration of the puzzle.
After Lotus uses her hacking skills to crack the computer's password, the display changes to a puzzle. The puzzle is a 3x3 grid of red and green squares, and touching any of the squares will cause that square and those adjacent to it to change color. The objective is to get all the squares to display green in at most four moves, and this is easily accomplished by pressing the squares indicated by Clover's note (the order being irrelevant, despite what the numbers on the note suggest).
Trivia[]

Science Boy ignites on fire.
- It is unclear whether or not any clue existed at all for the password in the wireless display, as any party entering Door 8 in the game always includes Lotus (including the case when Junpei chooses to explore Door 3).
- This is the only escape puzzle where one character is restricted to one room and you have to tell them what to examine.
- When Junpei examines Science Boy after it catches fire, he says "Oh, the humanity!", which is a reference to the famous news report about the Hindenburg blimp crash.
- In the Memories Of The Escape version of this room, there is a spelling mistake, when Junpei says "puzle". It is supposed to be spelled "puzzle".
- The iOS version does not explain how Junpei rescued Clover.
Humorous Quotes[]
- Examine iron gate with ethanol equipped:
- Junpei: Clover, use this ethanol. Junpei: You should be able to wipe off that permanent ink with it. Clover: What am I gonna wipe with...? Junpei: Oh, well, your clothes, of course. Clover: ... Junpei: ...Ha ha ha! Kidding! Just kidding! Please don't look at me like that. You're scaring me.
- Examine the wireless display with 2-pronged power cable in the inventory but unequipped:
- Lotus: Junpei, you're not too bright, are you? Junpei: Huh? What are you trying to say? Lotus: Arg! The cable! The plug! Lotus: You still don't get it? Junpei: A-Ah... Of...course I do.
- The power to the computer is not switched on.
- Examine mannequin:
- Clover: Is this, like, an examination table...? Clover: There's a creepy mannequin in here, guys...
- Clover: There's something sticking out of the mannequin's head, like...wires or something. Junpei: What the hell were they doing in there...
...Huh? Why's she all quiet now? Clover: They were doing experiments on humans... Probably...
Oh man, now she looks sad... Junpei: ? - There's a mannequin lying on the exam table.
I can't really see it very well from here, but it looks like there are a bunch of electrodes sticking out of its head. - There's a mannequin lying on the exam table. It's got a bunch of electrodes sticking out of its head.
- That mannequin looks so...sad... I gotta admit, I'm starting to feel kinda sorry for it.
- Am I getting attached to this thing?
...Maybe I should give it a name.
How about the Science Boy...? - Science Boy is lying on the table. His poor head is full of electrodes.
- Examine mannequin on fire, if you named it:
- Science Boy's head is on fire. Junpei: Science Boy! Noooooooooo! Oh, the humanity! Lotus: What the hell is "Science Boy"?! Are you...are you talking about the mannequin?! Junpei: ...Yes... Lotus: Forget about the mannequin! You need to help Clover, now!
- Science Boy's head is on fire.
I feel bad for him, but he's already done for. I need to save Clover!
- Science Boy's head is on fire.
- Examine right door after saving Clover:
- Clover: What are you doing Junpei!? Not that way!
- Clover: Are you an idiot?! Clover: That's the laboratory! Y'know, the room full of FIRE!? You wanna burn to death?!
- Examine right door after saving Clover, if Science Boy was named:
- Clover: Heeeeeeeey! Knock that off! Junpei: Yeah, yeah, I know... Junpei: I just feel kinda bad for leaving Science Boy in there to die... Clover: Whaaaaaaaa?! The MANNEQUIN!?
- Clover's eyes are kinda freaking me out right now. Maybe I should just give up on the mannequin...
- So long, mannequin... You may not have been a real man, but I always thought of you as kin...
- Examine left door after setting mannequin on fire, before saving Clover:
- Lotus: Junpei, look! Lotus: The light! It's green! Junpei: The emergency system has activated and disabled the lock!
- Lotus: W-Wait, Junpei! Lotus: You aren't going to leave Clover behind, are you?
- We can't leave Clover behind.
- We can't leave Clover behind...
- I could leave her... Just book it with Lotus. At least we could save ourselves--
No...no! What the hell are you thinking, Junpei?! What is wrong with you!?
Then again, she is--
No! No no no no NO! I can't do that!
I might survive, but I couldn't live with myself... - Clover is in big trouble over in the laboratory. We gotta save her!